
The Second Chance House: Staging Pics
As a reminder, here is a link to the BEFORE pictures of The Second Chance House…
Here are some AFTER pictures of the The Second Chance House:

Front of House

View from Main Entryway into House

View of Living Room from Entryway

View of Living Room from Bonus Room

View of Living Room from Kitchen

View of Kitchen
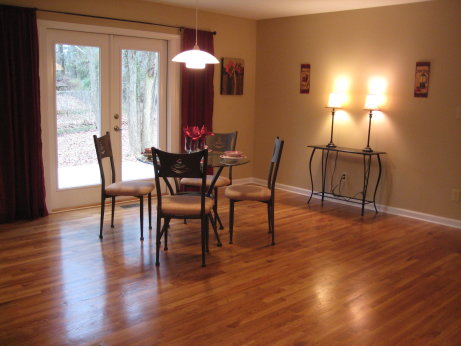
View of Dining Room

View of Bonus Room

View Out of Bonus Room into Main Living Area

View of Main Living Area from Bonus Room

Master Bedroom

Master Bathroom

Second Bedroom

Third Bedroom or Office


This is ABSOLUTELY GORGEOUS!!!! I love this flip!
EXCELLENT!!!! Well Done!
Excellent work! Love all the details!
Man excellent selections on materials love that kitchen new modern look . You would never believe you where there with a slachhammer LOL ?
I have been reading your blog from start to this point, and loving it. You totally energized me and inspired me to create my own blog so I can create some “virtual” accountability and also a way to track my progress. So, thanks.
Quick question in regards to the staging. How much of the furniture do you outright purchace and is any of it rented? Where do you store it?
Thanks!
Hey Mat –
We own all of our own staging furniture; we don’t rent any of it. After doing the cost-benefit analysis, it quickly became obvious that if were were going to stage just 1 or 2 houses, it would be cheaper to own the furniture.
Originally, we were only planning to stage our own houses, but my wife really loves doing it, so she started staging for some other local investors a couple months ago, and has been averaging a couple jobs per month. We own 6 full sets of furniture now (we mix and match), and until today, we’ve never had an issue with having to store any of it, as we always seem to have houses ready for staging after another house sells. Occasionally, we’ll have a few extra pieces that we’re not using, and we’ll store them in our garage.
But, today was a tough day for us. We already had one set of extra furniture stored in our garage, and today one of the investors that we stage for had closing on two sales. So, we had to pick up two more sets of furniture today and bring them back to our house. We considered getting a storage locker, but then realized that we have a 300 sq ft unfinished part of our basement that we were just using to store crap. So, we threw away a lot of crap, and now we have a completely full storage area in our basement with 3 houses worth of staging furniture!
For reference, we’ve gotten to the point where we can fully stage a 3/2 for about $2000-2500. It takes some work to get it that cheap (lots of negotiating, buying in bulk, shopping for deals on Craigslist, etc), but it can certainly be done.
Wow! Nice job…From the video, I didn’t think you were going to take out all of the interior walls in the kitchen. It turned out way better then I thought it would!!!!
What a difference from the start! Nice Job! I am doing a similar rehab right now and wanted to know what flooring that is? Real hardwoods or laminate? Do you remember the color? Also the cabinets, are they stock from depot or special order? Neighbors must also be happy!
Hi Dave –
The flooring is real 3/4″ oak hardwood stained and polyurethaned on-site (I think we paid $5.25/sf back then). And I believe the color we went with in this house was Golden Oak.
As for the cabinets/countertops, we use a small manufacturer named Liberty Cabinets, and they are measured, ordered and installed by a local cabinet company we work with.
I really like the back splash you used in the kitchen. Do you remember what you used?
Thanks
Thanks George…that’s travertine…
Hi,
I recently found your website and find it very informative!
I noticed that you replaced all old windows with new ones. I’m working on 2 flips now and am considering replacing the windows. Is it worth the expense? Your house looked good with the new windows by the way.
Also, how much is your material & labor (approximate) when adding new windows?
For the flooring, does the $5.25 include both material & labor?
Thanks for your help!
Hi Sal,
Generally speaking, we only replace windows if they are broken, failed (meaning the seal is broken and they are fogged) or in extremely poor shape. In many of the houses we purchase, we end up replacing between 2-5 windows, on average.
There are a couple ways to fix windows:
1. You can replace the entire window, which in my area for a typical sized window would cost about $150-200;
2. You can replace a window sash (the top or bottom portion of a double-hung window), which in my area for a typical sized window sash would cost about $110-130;
3. You can replace just the glass of an insulated window, which in my area for a typical sized window would costs about $70-100.
As for the hardwood flooring, the $5.25 (now closer to $5.75), includes the material, plus the installation, plus staining and 3 coats of polyurethane.
Hello J Scott,
I found your link on BP and have been browsing your site. Lots of great work! I have a question about the bonus room (garage conversion). In the “before” pics, it appears that wood paneling was originally used. In your “after” pic (which looks a million times better!) is it simply painted over? Or did you install new wallboards?
Thanks and keep up the awesome work!
Hi Jonathan –
For this house, the entire bonus room was torn down to the studs (it wasn’t built to code and there was a good bit of termite damage), and new sheetrock was installed to properly finish the room, along with updated wiring and HVAC.
While it’s easier to just paint over paneling, the end result tends to look like painted paneling as opposed to a properly finished room, so in these situations, we like to tear out all paneling and completely re-sheetrock the room.